Headline Headline Headline
Lorem ipsum dolor sit amet, consectetur adipiscing elit, sed do eiusmod tempor incididunt ut labore et dolore magna aliqua. Ut enim ad minim veniam, quis nostrud exercitation ullamco laboris nisi ut aliquip ex ea commodo consequat. Duis aute irure dolor in reprehenderit in voluptate velit esse cillum dolore eu fugiat nulla pariatur. Excepteur sint occaecat cupidatat non proident, sunt in culpa qui officia deserunt mollit anim id est laborum.
INTRODUCTION
This is the Paragon 360 team’s guide to using Craft, the content management system for Paragon 360’s website. The Paragon 360 team can log in to the CMS at Paragon360.com/admin.
LIST OF SITE MODULES
All of Paragon 360's site modules can be found on the List of Page Blocks page.
GETTING AROUND YOUR CMS: DASHBOARD NAVIGATION SECTIONS
When a user logs in to the Craft CMS, the first thing he or she will see is the CMS dashboard (see Figure 1). It shows recent entries made in the CMS and a left-hand sidebar that contains links to every editable element on the site. These links are explained in more detail below.
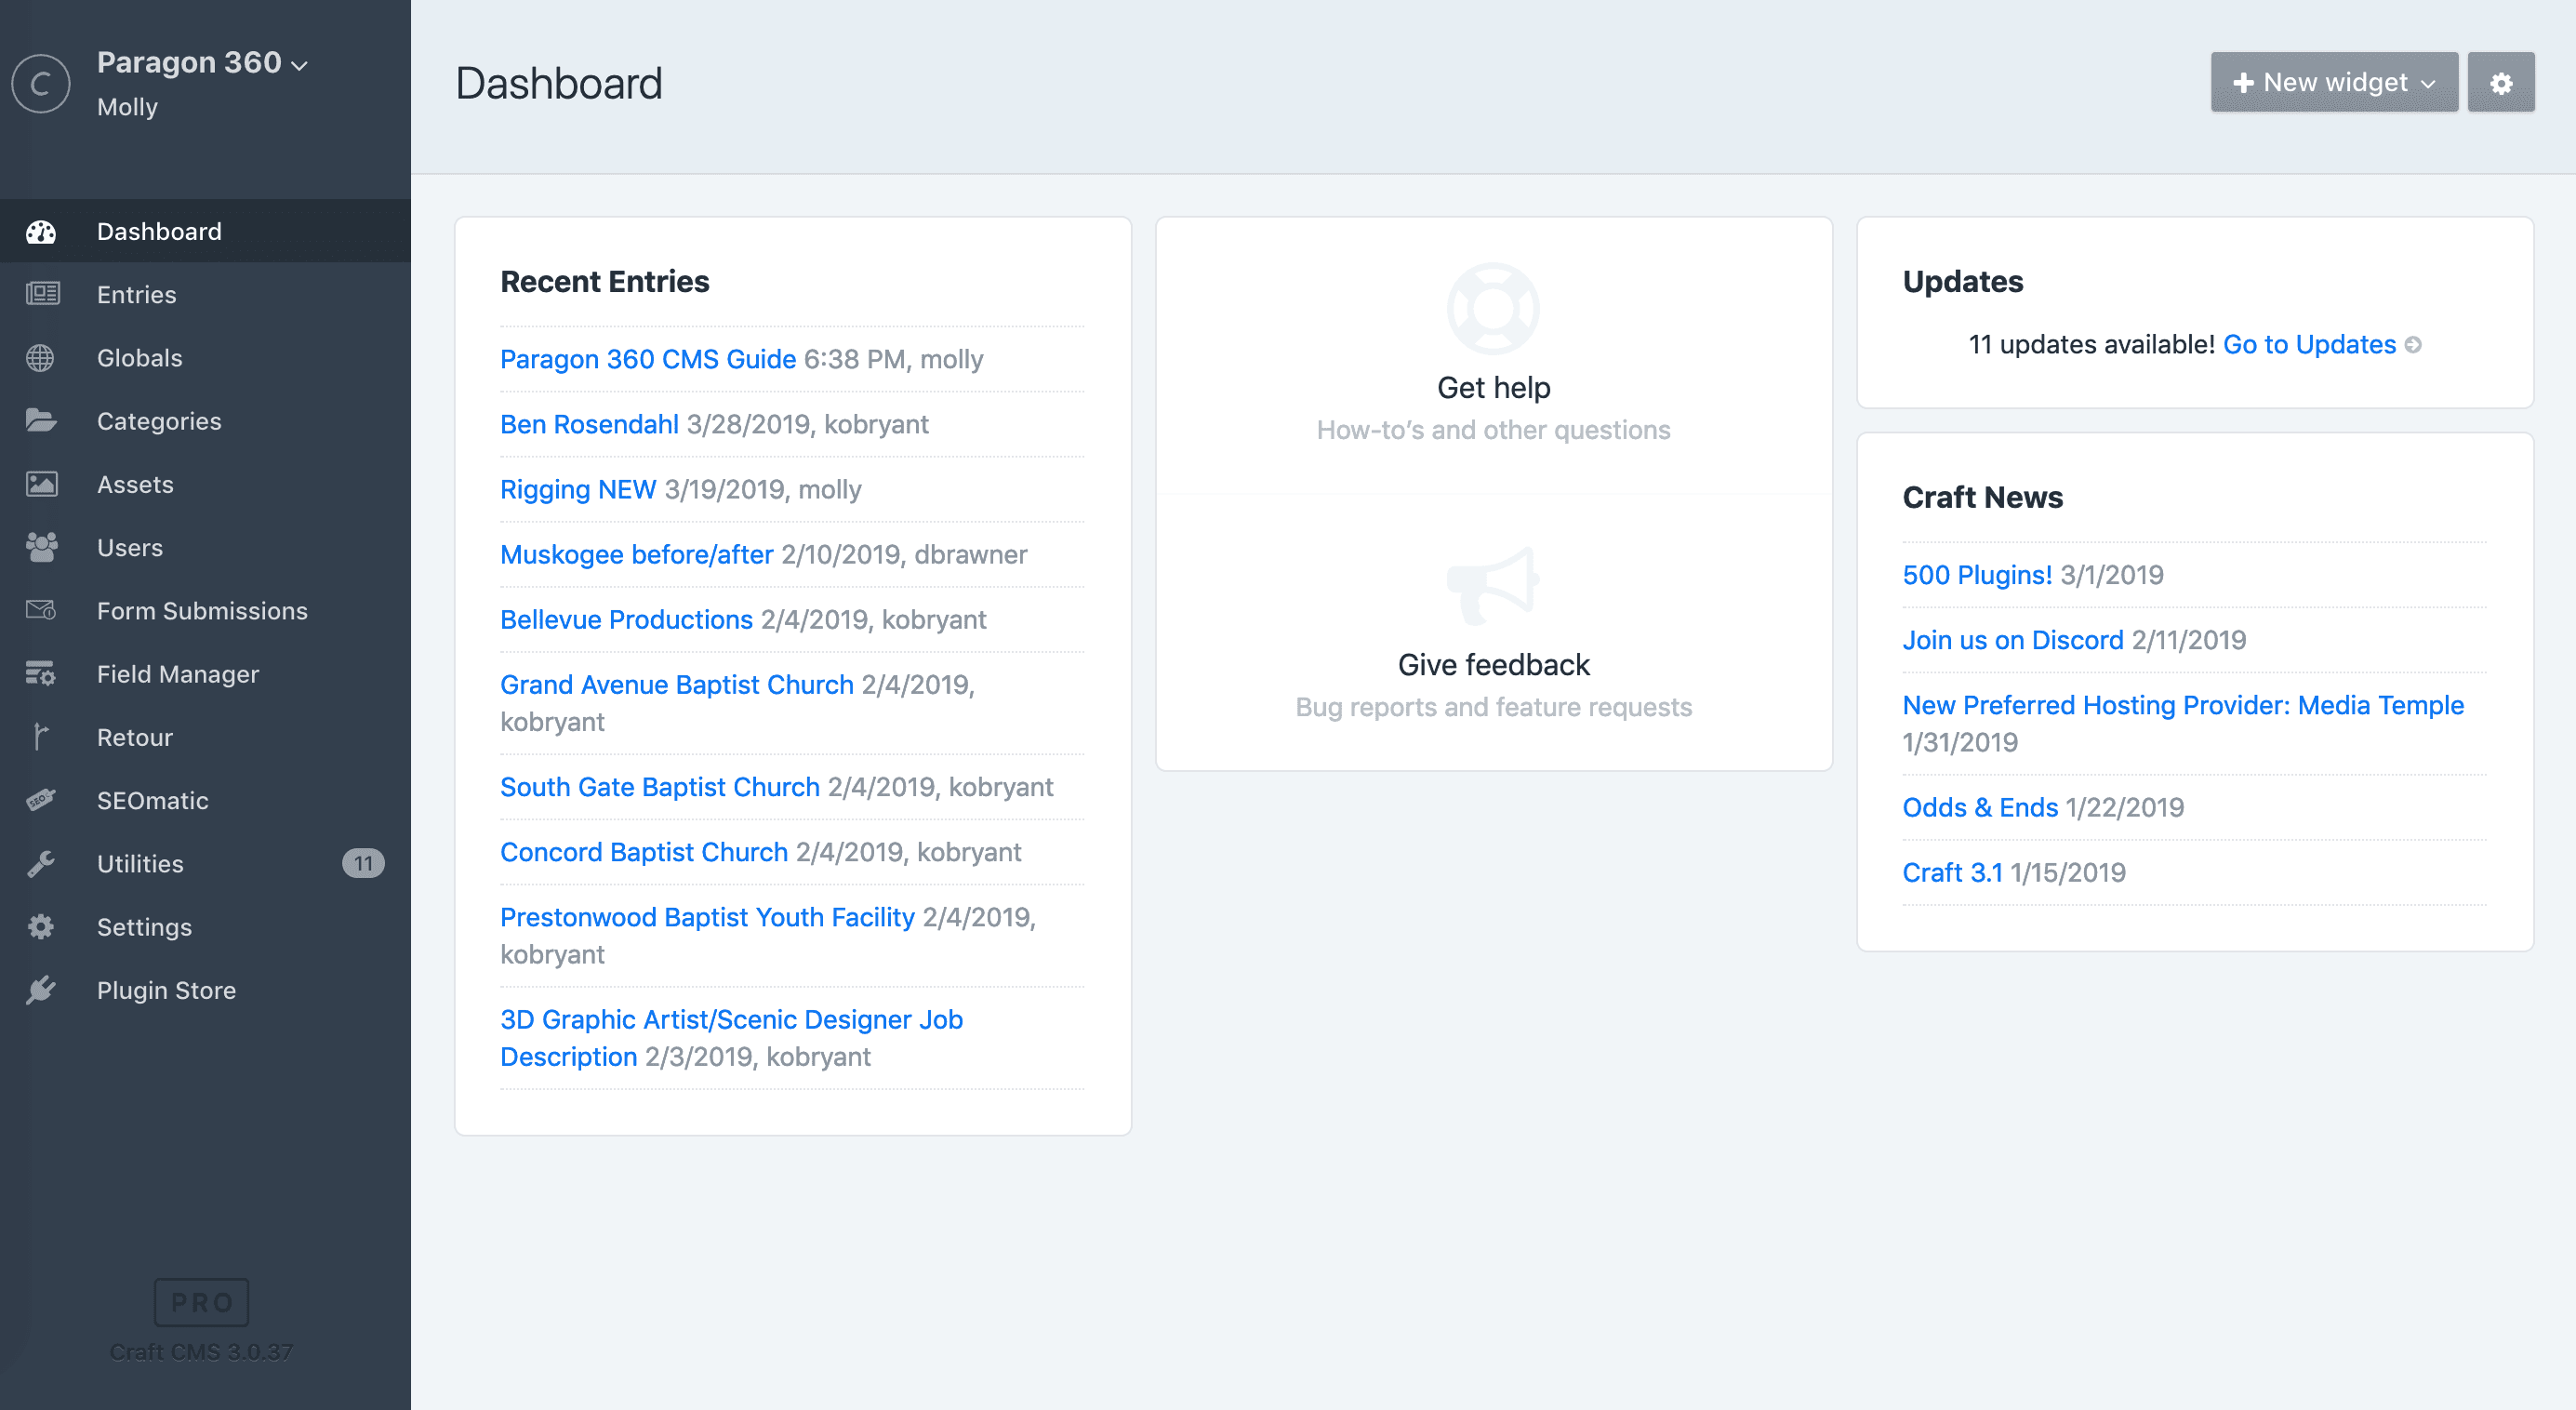
FIGURE 1: THE CMS DASHBOARD
Dashboard
The dashboard is a landing page with widgets that alert users of recently posted content.
Entries
From team member bios to projects to static pages, site content users will work with the most lives inside this link. There are lots of entry category types you'll get familiar with over time. The differences between each category type is detailed in the next section, Types of Entries.
Globals
This is the section for content that lives “globally” or on multiple pages on the site. The “Globals” section contains an assortment of information that will likely not change often and has three subcategories:
- Footer — Copy for the newsletter portion of the footer as well as links to the Privacy Policy and Terms of Use pages
- Global Contact Info — Contact information that is displayed throughout the site, such as headquarters address, phone number, etc. and social links
- Navigation — Links and assets for the navigation menu that appears on hover (see Figure 1, below)
FIGURE 1: The “NAVIGATION” PORTION OF THE GLOBALS SECTION SUPPLIES THE SITE-WIDE NAVIGATION
Categories
In this section, users can add, edit, or delete two different categories that generate the sorting and display of project (or industry) and service information on the front-facing site. For instance, the Project Type categories manipulate what project types users can select from on the Projects landing page.
There are two category sections.
PROJECT TYPE
Also presented as industry types on the front-facing site, the Project Type category had three options at the time of this guide’s publishing:
- Houses of Worship
- Arenas, Stadiums, & Theaters
- Corporate
These Project Type categories serve a few different functions. First, they generate the options site users can choose from when they sort projects on the Projects landing page (see Figure 3, above). They also generate the category of content shown in the “More Like This” module on each project’s detail page. If a project has been given the “Houses of Worship” category designation, it will generate three more projects within this module—at random—at the bottom of the page. See Figure 4.
SERVICES TYPE
The Service Type categories manipulate what service types users can select from on the Projects landing page. At the time of this guide’s publishing, Mostly Serious and Paragon 360 worked to define nine overarching service categories:
- Audio
- Video
- Lighting
- Acoustics
- Scenic Elements
- Staging
- Seating
- Interior Design
- Rigging
Mostly Serious recommends exercising caution in adding additional categories in either of these sections to ensure the quality of site users’ information-gathering experience is maintained. Because Paragon 360 offers such a comprehensive suite of services, keeping its components well-pruned will enhance users’ understanding of Paragon’s services and maximize their browsing experience.
Assets
This is the dedicated section—essentially a standard media library—for assets that live on the site, including videos, images, and documents. While files can be uploaded directly to this section, users may choose to upload assets to the media library within specific entries, bypassing this section entirely.
Users
This section is where existing users can add and manage new users. Note that users can simply add new users to the Admin group to automatically grant permissions shared by the rest of the team. Permissions can also be taken away for individual users (interns, for instance).
To add a new user to the CMS, complete the following steps:
- Log in to the CMS.
- Go to Users > + New User.
- Fill in the new user’s username, first name, last name, and email address. Be sure the Send
an activation email now?button is checked so that the new user will receive an invitation to complete his or her account setup.
Form Submissions
This section houses copies of all successful contact form submissions submitted through the Paragon 360 site (namely the Contact page form).
SEOMatic
SEOmatic is a plugin that performs a variety of helpful SEO-related functions on the site. In a nutshell, SEOmatic’s fields help ensure that content shows up for each of Paragon 360’s pages in search engine result pages (SERPs) and in page links shared to social media platforms like Facebook even if nothing specific has been filled out in the pages themselves. It essentially acts as a content safety net and sets Paragon 360 up for readable and visually enticing links no matter what.
SEOmatic is broken out into these sub-categories:
→ DASHBOARD
The dashboard shows on a graded scale how complete the site's global SEO, content-specific SEO, and general settings are. It’s okay if the Content SEO and Site Settings do not have a score of 100%—they may not receive a perfect score if they contain some information fields that are not applicable to your site.
→ GLOBAL SEO
The Global SEO section presents fields that, when filled in appropriately, ensure relevant site content shows up in SERPs and page link previews shared on social media. The individual settings themselves are numerous and are available for Google, Twitter, and Facebook. If no information is filled out for a given social media page, it simply will not show.
→ CONTENT SEO
The Content SEO section is precisely like the Global SEO section except that it allows display automation in slightly more specificity than the Global SEO section. Default SEO settings and social link displays can be set for specific entry types:
- Pages
- Projects
- Services
- Industries
- 404 Page
Because these sections have all been filled out to completion by the Mostly Serious team, content in this entire CMS section will only need to be adjusted if CMS users would like to update any of the backup content generated.
ENTRIES, EXPLAINED: PAGES, SINGLES, AND MORE
Almost all of your site's content—from the pages themselves to the modular “Shared Blocks” components that can be added to any page with the click of a button—lives in the Entries section in the CMS. In the Entries section, CMS users will find the following entry categories:
Pages
This category contains page entries that don’t fall into a more specific category. Pages like the homepage, About Us page, and Careers page live in this section. Note that the Projects and Current Projects pages are also listed here because they are technically not projects themselves. Most of the site’s landing pages can be found here.
Projects
This category contains all of the site's project profiles, which are accessible from the Projects landing page.
Services
This category contains the Services pages, which are primarily accessed through the Expertise landing page. They are nested in the CMS according to their intended site flow on the site and should not be rearranged.
Industries
If and when your team has a use for industry-specific pages (for instance, to share with a client at a trade show), they can be accessed here. These pages are not accessible from the live site—they will only be viewable if the URL is shared.
Clients
This section populates the dynamically generated client roster that appears on the Client List page. By clicking + New entry in the top right-hand corner of the screen, users can add new clients by entering the client’s name, location, and project type. Clients can also be rearranged by using the drag-and-drop tool. Note that clients are listed in consecutive order in the CMS and that the same order is reflected on the Client List page. For instance, if First Dallas is the first client listed in the CMS, it will be the first to appear on the Client List page. Users can also edit existing entries by simply clicking client names in this section.
Team Members
This section populates the dynamically generated display of employee bios that appear on the About Us page. By clicking + New entry in the top right-hand corner of the screen, users can add new team members by entering their name, job title, profile image, email address, and a brief (two paragraphs or less) bio. Users can also edit existing entries by simply clicking on names in this section.
Singles
This section contains the static 404 and 500 pages, which generate error messages if a broken link or server error occurs.
Shared Blocks
This last section houses the “shared” blocks present on many pages on the site. These are accessible within the pages they appear on, so much like the Assets page, shared blocks are simply stored here. However, new shared blocks can be added and existing blocks can be edited here as well.
Helpful Craft CMS Features
A few useful tips, tricks, buttons, and shortcuts are listed below to help CMS users maximize their Craft workflow.
Rearrange the Order of Information
Paragon 360 users can rearrange the order of information as it appears on the live site in many different places in the CMS.
How to find this feature: Look for a small gray icon made of four gray dots next to the entry you want to re-order in the CMS.
View Live Pages
To view the live version of a page, Paragon 360 users can click the small blue globe icon as it appears next to applicable entries in the CMS.
How to find this feature: Click the blue globe icon to the right of any entry in the CMS.
Preview Your Page Updates As You Make Them
One of Craft’s most handy features is its ability to let users view their updates before a page is published. To view a page in Live Preview mode, simply click Live Preview at the top of the page being worked on. All content fields will slide to the left so the page’s new version can continually update on the right.
How to find this feature: Look for a black eye icon next to Live Preview at the top of the page you're working on.
Expand, Collapse, and Clone Modules
Shuffling or recreating modules can be cumbersome when one or more of them are quite lengthy. By clicking the small gray gear and drop-down arrow at the top-right of each module, users can choose to collapse a module’s components into one easy-to-move bar. The same icon expands the module out again. In addition, modules can be cloned or the same type of module can be added above an existing one via the same gear icon.
How to find this feature: Look for a gear icon and a down arrow at the top-right of the module you want to expand, collapse, or clone.
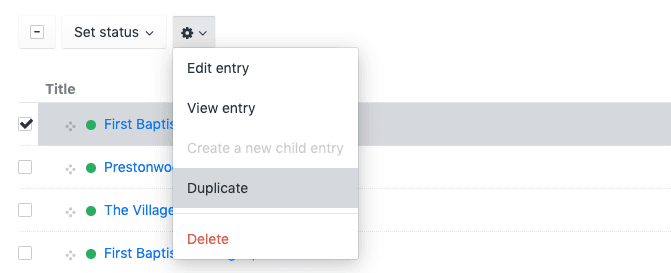
Duplicating Entries for Easier Page Additions
A handy time-saving trick when crafting new projects or other pages is to simply duplicate an existing entry instead of making a new one from scratch. Then, the user working on the entry can simply edit information already on the page. This helps retain consistency in design and elements—and helps users remember everything that should be included on a page.
How to find this feature: In the CMS dashboard, select the page you want to duplicate by clicking the checkbox to the left of the page name. Click Duplicate.
HOW TO RESET YOUR PASSWORD
If you've forgotten your password, go to Paragon360.com/admin and click "Forgot your password?"
Upon clicking that link, you'll be prompted to enter the email address or username you use to log in to the CMS. You'll receive an email with instructions to reset your password.
If you still need help, reach out to a Mostly Serious team member.
TEXT FORMATTING OPTIONS
When it comes to text styling on your site, there are plenty of options available to make content stand out and establish hierarchies readers can understand. Use the examples below of each formatting option as a reference for building and editing web content:
H1s look like this.
H2s look like this.
H3s look like this.
H4s look like this.
H5s look like this.
H6s look like this.
Regular text looks like this.
Quoted text looks like this.
Bolded text looks like this.
Italicized text looks like this.
Links inside of text look like this.
Regular text can also be formatted in bulleted lists:
- List item 1
- List item 2
- List item 3
Or numbered lists:
- Numbered item 1
- Numbered item 2
- Numbered item 3
Text can be formatted to the left.
Text can be centered.
Text can be formatted to the right.
To use any of the formatting options noted above, select from the available icons at the top of the WYSIWYG ("What You See Is What You Get") field in the Rich Text or Stretch Callout module options. Note that modules with these formatting options are limited to the Rich Text and Stretch Callout modules.
ASSETS & IMAGE SIZES
Adding assets to the site takes important consideration, especially in the case of Paragon 360’s site. Many images on the site are full-width—meaning they take up the full width of the user’s screen—and thus require a larger resolution to ensure a crisp appearance. It is possible to upload large-resolution images that still allow for quick load times, but CMS users should be sure to follow these guidelines to make sure large, beautiful images look great, perform well, and don’t bog the site down:
- Use .jpg files as much as possible versus .png files because .jpg files are smaller and load quickly.
- Ensure the main focus of the image is toward the center to avoid it being cropped out, which may
happen as a result of responsive adjustments for different screen sizes. - After editing a .jpg image file, consider passing it through an additional compression tool that cuts
out unnecessary data and makes the image’s data size smaller. Mostly Serious recommends sites like TinyPNG or Free Image Optimizer. - Choose the right pixel size for the image being uploaded. Follow the reference list below.
Hero Banner Images
1,400 x 700
Images for Full-Width Sliders and Callouts
1,400 x 700
Team Member Headshots
350 x 425
Bottom-of-Page Callout Background Images
1,250 x 400
Card Set Background Images
350 x 375
Video Thumbnail Images
600 x 350
Project Thumbnail Images
450 x 350